
Home / Free Tools And Solutions / Software-Based Speaker Switch for Any Old 5.1 Receiver
Software-Based Speaker Switch for Any Old 5.1 Receiver
Premium receivers have some useful functionality around speaker-switching and channel-mapping built into them that their lower-priced counterparts do not. This writeup shows how to get that functionality for free.
The goal here, in “receiver marketing terms”, is:
- Multi-Zone Audio Output
- Speaker Switching (A/B Speaker Logic)
- 4-Channel Stereo Mode
- Custom Channel Remapping
- Bi-Amping on Non-Bi-Amp AVRs
- Preserved Auto Calibration Settings
- Zero-Hardware Switching / Automation Control

What you will need (Hardware)
- An AVR with 5.1 or 7.1 Capability.
Any old or cheap receiver with discrete surround channels (e.g., thrift store Pioneer, Denon, Yamaha, Onkyo).
Must have a digital input (optical, HDMI, or coaxial). - A Linux-Compatible Machine.
Desktop, laptop, or single-board computer (e.g. Raspberry Pi).
Running Debian, Ubuntu, or any Linux distro with PipeWire support. - A Raspberry Pi (3, 4, or 5) is a particularly good fit for this:
cheap, silent, low-power, and can be left running permanently as a dedicated speaker switch without tying up an everyday computer.
If using a Pi, a small USB sound card with 6+ channel support (see the connectivity note below) is usually more reliable for multichannel output than the Pi's built-in HDMI audio. - Digital Audio Output from Linux.
HDMI or SPDIF/optical preferred.
Must be recognized as a multi-channel output device (e.g., 5.1 capable).
Obviously you will need the correct cable to connect your Linux machine to your receiver.
(If your receiver uses Optical or Coax, and your Linux machine has neither port, there are cheap ($20) devices on Amazon that plug into USB and output a 5.1 signal in various formats. Look for “USB sound card” and make sure it supports 6 channels or more and Linux.)
What you will need (Free software)
- Linux OS with PipeWire Support
- Recommended: Debian 12+, Ubuntu 22.04+, or any modern distro using PipeWire by default
- Ensures low-latency, flexible audio routing across digital outputs (HDMI/SPDIF)
- PipeWire Tools
- Core audio system replacing PulseAudio and JACK
- Already active on most modern Linux distributions
- Helvum
- GUI tool to visually wire channels to output ports
- Custom Scripts (Examples Provided in this Writeup)
- Python and tkinter are needed to run the examples
- (Optional) GUI Launcher or Web Panel
- If desired, a simple GUI (e.g. Zenity, YAD) or web interface (e.g. Flask app) can trigger presets
- Touchscreen Raspberry Pi or browser-based control are both possible
How do I get/install/use the software? How do I make/modify scripts? How do I execute scripts?
If you're unfamiliar with Linux or the tools involved, point an AI assistant at this page and ask it to walk you through the whole process. It should be able to: figure out and install whatever's missing for your distro (PipeWire, PipeWire Tools, Helvum, and Python/tkinter for the GUI); ask you the right questions about your own hardware (your receiver's PipeWire sink name, how many channels it has, and which physical speakers are connected to which outputs) so it can adapt the scripts below to your setup instead of copying mine as-is; and then help you save, make executable (chmod +x), and run each script, troubleshooting along the way.
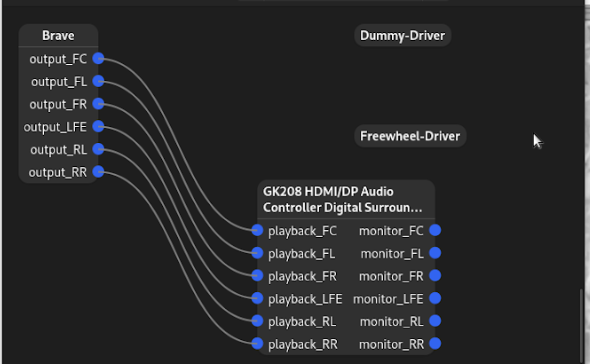
(This is what Helvum looks like in a very simple scenario, using the “Brave” web browser and an Nvidia card [the GK208]. This shows the mapping of audio channels from the browser to the Nvidia card which is hooked to the receiver via HDMI)
Putting it together
The idea is this: The Linux tools can map any channel to any other channel. Channels can be combined or duplicated or disconnected. Some ways to use this are:
- Map Source FR (Front Right) and Source FL (Front Left) to Receiver RR (Rear/Surround Right) and Receiver RL (Rear/Surround Left). With everything else disconnected, this sends a stereo signal to your Surround speakers only.
- Map Source FR and Source FL to Receiver FR+RR and Receiver FL+RL. This gives you 4-Channel Stereo. It can also be used to Bi-Amp speakers on receivers that don't have Bi-Amp capability.
- Change the mapping on the fly using a script. This can be integrated into a GUI or even automated. This allows your Linux machine to act as an advanced Speaker Switch.
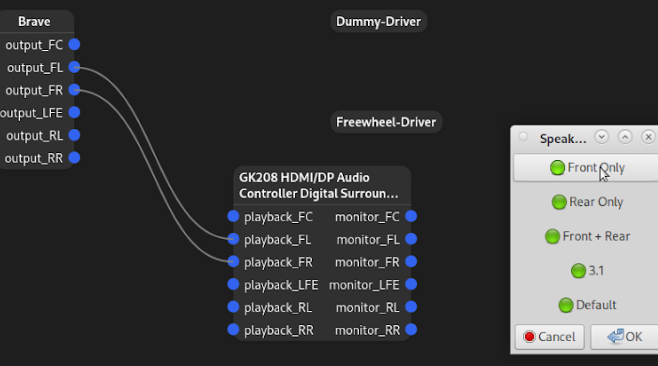
(Stereo from the audio source [Web Browser] directed to the front pair of speakers only. All other channels are disconnected.)
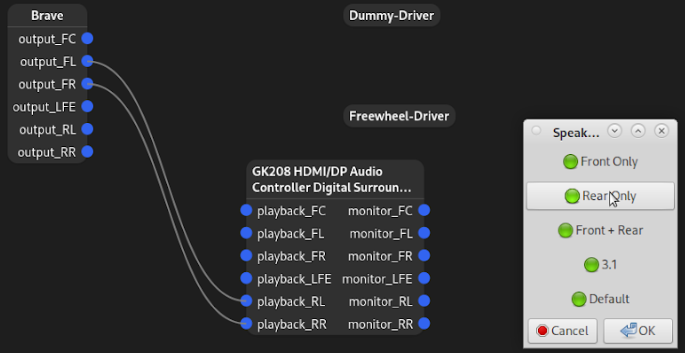
(Stereo from the audio source [Web Browser] directed to the “rear” pair of speakers only. All other channels are disconnected.)
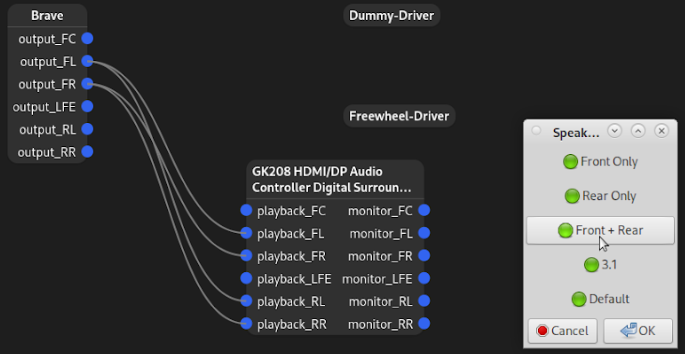
(Stereo from the audio source [Web Browser] directed to the front and “rear” speakers. This is similar to the “4-Channel Stereo” offered by some Receivers.)
Creating a virtual Audio Device
Below are the scripts for creating “Outpost”. Outpost is a virtual 5.1 device.
Outpost acts as a middleman between your apps and your real output device. This keeps your custom mappings alive even when no audio is playing, and allows all apps to use them consistently.
You will need to fit the script to your own hardware. The name of the hardware device will be different for you, and you may want to take advantage of 7 channels instead of just 5.
You will need to run the creation script each time you log into your computer, unless you automate it or include it in the GUI script.
Outpost Creation Script (create_outpost.sh)
#!/bin/bash
# create_outpost.sh

HDMI_SINK="VSX-823"

# Remove all Outpost-related sinks if present (safe loop)
for sink in Outpost OutpostStereo; do
  pactl list short modules | grep "module-null-sink" | grep "sink_name=$sink" | while read -r line; do
    module_id=$(echo "$line" | awk '{print $1}')
    echo "Unloading $sink module ID $module_id..."
    pactl unload-module "$module_id"
    sleep 0.5
  done
done

# Create Outpost 5.1 sink
echo "Creating Outpost 5.1 sink..."
pactl load-module module-null-sink \
  sink_name=Outpost \
  sink_properties=device.description=Outpost \
  channel_map=front-left,front-right,front-center,lfe,rear-left,rear-right

# Create OutpostStereo sink
echo "Creating OutpostStereo sink..."
pactl load-module module-null-sink \
  sink_name=OutpostStereo \
  sink_properties=device.description=OutpostStereo \
  channel_map=front-left,front-right

sleep 2 # Give ports time to initialize

# Outpost 5.1 -> HDMI
echo "Linking Outpost (5.1) to HDMI..."
for ch in FL FR FC LFE RL RR; do
  from="Outpost:monitor_$ch"
  to="$HDMI_SINK:playback_$ch"
  if pw-link -l | grep -q "$from -> $to"; then
    echo "Already linked: $from -> $to"
  else
    pw-link "$from" "$to" || echo "Failed to link $from -> $to"
  fi
done

# OutpostStereo -> HDMI FL/FR
echo "Linking OutpostStereo to HDMI FL/FR..."
for ch in FL FR; do
  from="OutpostStereo:monitor_$ch"
  to="$HDMI_SINK:playback_$ch"
  if pw-link -l | grep -q "$from -> $to"; then
    echo "Already linked: $from -> $to"
  else
    pw-link "$from" "$to" || echo "Failed to link $from -> $to"
  fi
done
Selecting the Virtual Audio Device
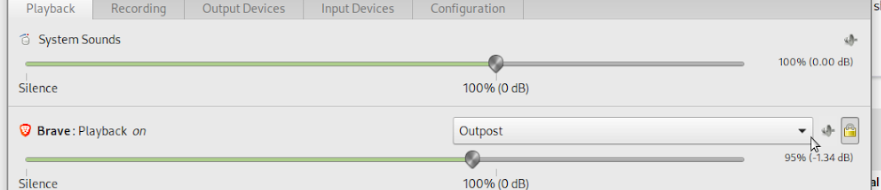
If you don't have PulseAudio, you will need it installed. In PulseAudio Volume Control, set your app to use “Outpost” or “Outpost Stereo” as the playback device.
Why “Outpost Stereo”?
The script creates “Outpost” and “Outpost Stereo”.
The reason for this is some applications tailor their audio output to the connected audio device. Brave and Chromium browsers do this.
Brave will take a 2 channel youtube audio source and remap it to 5.1 if it determines that it's connected to a 5.1 audio device. This behaviour is not ideal. By connecting Brave to “Outpost Stereo”, Brave will stop doing its own remapping on 2 channel sources. In the case of 5.1 channel sources, connect Brave to Outpost 5.1 to allow all 5 channels to pass through.
In practice, having the two virtual audio devices is useful.
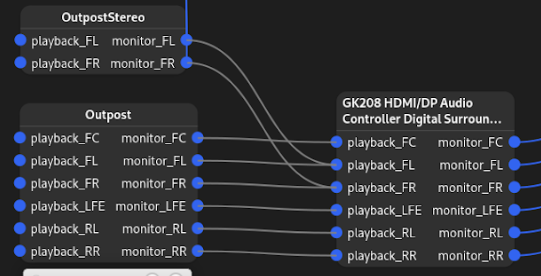
(Helvum screen showing the “Outpost” Virtual Audio Devices connected to the Audio Hardware)
Example Setup and Scripts
The project was implemented with the following hardware:
- Pioneer VSX-823 Receiver
- Desktop computer running Debian Linux and an NVIDIA GeForce GT 730 Graphics Card.
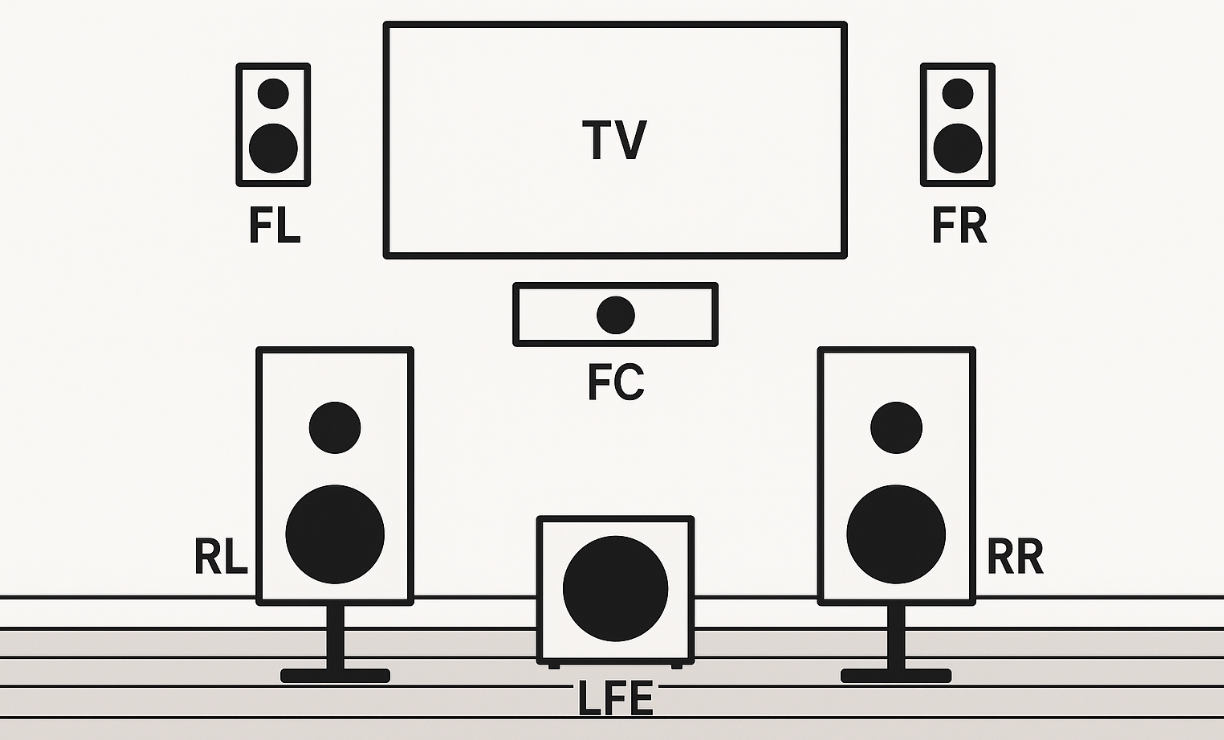
- Two KEF C1 speakers wall-mounted (FL and FR)
- Two larger Tannoy speakers (8" drivers) on stands (RL and RR). These speakers are physically at the front, but connected to the Receiver outputs labelled “Rear” or “Surround”
- A Center Channel and a Sub
The Debian Machine is connected to the Receiver via HDMI.
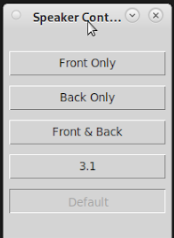
The following scripts are available:
- Disconnect all channels and map Source FR and FL to Receiver FR and FL. This is “Front Speakers Only”
- Disconnect all channels and map Source FR and FL to Receiver RR and RL. This is “Rear Speakers Only”
- Disconnect all channels and map Source FR and FL to Receiver FR + Receiver RR and Receiver FL + Receiver RL. This is “Front and Rear Speakers”
- Disconnect all channels and map Source FC to Receiver FC, Source FL + Source RL to Receiver FL, Source FR + Source RR to Receiver FR, Source LFE to Receiver LFE. This is “3.1”. It's basically a Pro-Logic Mapping.
- Map every input in the original/expected way. This is “Default”
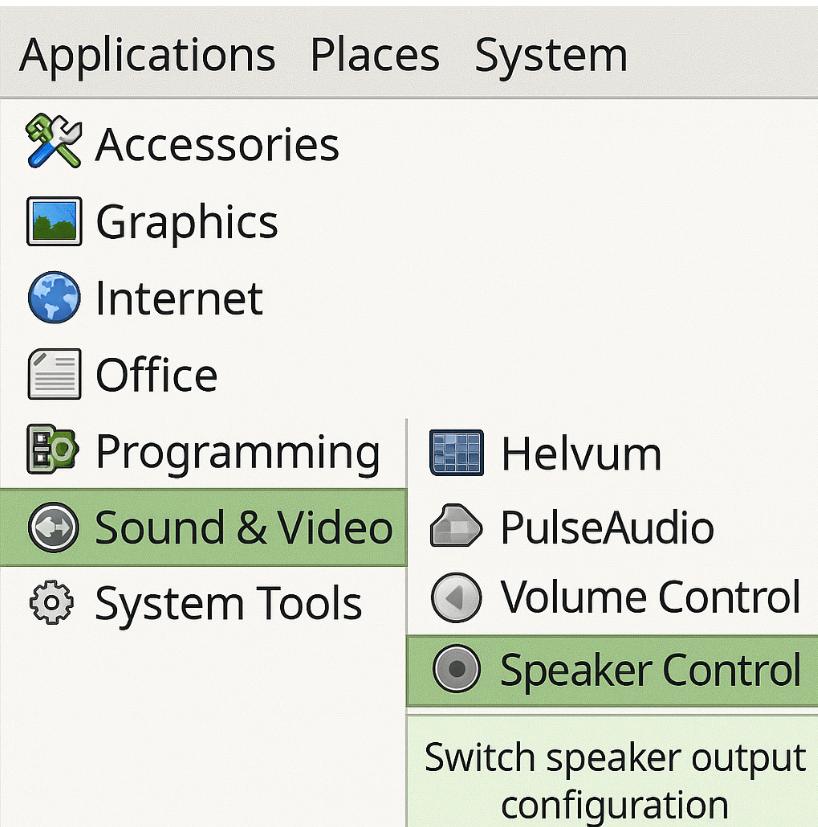
The scripts are called by a GUI and a link is placed in “Applications/Sound & Video” with the label “Speaker Control”.
speaker_switch_scripts.sh (a script to create the 5 mode scripts above)
#!/bin/bash
# speaker_switch_scripts.sh
# Contains standalone scripts for speaker routing modes using nested-loop cleanup

# Shared functions for unlinking
cat << 'EOF' > shared_audio_functions.sh
#!/bin/bash

HDMI_SINK="VSX-823"

cleanup_outpost() {
  for ch1 in FL FR FC LFE RL RR; do
    for ch2 in FL FR FC LFE RL RR; do
      pw-link -d Outpost:monitor_$ch1 $HDMI_SINK:playback_$ch2 2>/dev/null
    done
  done
}

cleanup_stereo() {
  for ch1 in FL FR; do
    for ch2 in FL FR FC LFE RL RR; do
      pw-link -d OutpostStereo:monitor_$ch1 $HDMI_SINK:playback_$ch2 2>/dev/null
    done
  done
}
EOF
chmod +x shared_audio_functions.sh

## front_only.sh
cat << 'EOF' > front_only.sh
#!/bin/bash
source ./shared_audio_functions.sh
cleanup_outpost
cleanup_stereo

for ch in FL FR; do
  pw-link Outpost:monitor_$ch $HDMI_SINK:playback_$ch
  pw-link OutpostStereo:monitor_$ch $HDMI_SINK:playback_$ch
done
EOF
chmod +x front_only.sh

## back_only.sh
cat << 'EOF' > back_only.sh
#!/bin/bash
source ./shared_audio_functions.sh
cleanup_outpost
cleanup_stereo

pw-link Outpost:monitor_FL $HDMI_SINK:playback_RL
pw-link Outpost:monitor_FR $HDMI_SINK:playback_RR
pw-link OutpostStereo:monitor_FL $HDMI_SINK:playback_RL
pw-link OutpostStereo:monitor_FR $HDMI_SINK:playback_RR
EOF
chmod +x back_only.sh

## front_and_back.sh
cat << 'EOF' > front_and_back.sh
#!/bin/bash
source ./shared_audio_functions.sh
cleanup_outpost
cleanup_stereo

# Outpost: link to both front and rear
pw-link Outpost:monitor_FL $HDMI_SINK:playback_FL
pw-link Outpost:monitor_FR $HDMI_SINK:playback_FR
pw-link Outpost:monitor_FL $HDMI_SINK:playback_RL
pw-link Outpost:monitor_FR $HDMI_SINK:playback_RR

# Stereo: same mapping
pw-link OutpostStereo:monitor_FL $HDMI_SINK:playback_FL
pw-link OutpostStereo:monitor_FR $HDMI_SINK:playback_FR
pw-link OutpostStereo:monitor_FL $HDMI_SINK:playback_RL
pw-link OutpostStereo:monitor_FR $HDMI_SINK:playback_RR
EOF
chmod +x front_and_back.sh

## three_point_one.sh
cat << 'EOF' > three_point_one.sh
#!/bin/bash
source ./shared_audio_functions.sh
cleanup_outpost
cleanup_stereo

# Outpost 5.1 links
pw-link Outpost:monitor_FC $HDMI_SINK:playback_FC
pw-link Outpost:monitor_FL $HDMI_SINK:playback_FL
pw-link Outpost:monitor_RL $HDMI_SINK:playback_FL
pw-link Outpost:monitor_FR $HDMI_SINK:playback_FR
pw-link Outpost:monitor_RR $HDMI_SINK:playback_FR
pw-link Outpost:monitor_LFE $HDMI_SINK:playback_LFE

# OutpostStereo links
pw-link OutpostStereo:monitor_FL $HDMI_SINK:playback_FL
pw-link OutpostStereo:monitor_FR $HDMI_SINK:playback_FR
EOF
chmod +x three_point_one.sh

## default.sh
cat << 'EOF' > default.sh
#!/bin/bash
source ./shared_audio_functions.sh
cleanup_outpost
cleanup_stereo

# Outpost 5.1 full 1:1 mapping
pw-link Outpost:monitor_FL $HDMI_SINK:playback_FL
pw-link Outpost:monitor_FR $HDMI_SINK:playback_FR
pw-link Outpost:monitor_FC $HDMI_SINK:playback_FC
pw-link Outpost:monitor_LFE $HDMI_SINK:playback_LFE
pw-link Outpost:monitor_RL $HDMI_SINK:playback_RL
pw-link Outpost:monitor_RR $HDMI_SINK:playback_RR

# OutpostStereo 1:1 front L/R
pw-link OutpostStereo:monitor_FL $HDMI_SINK:playback_FL
pw-link OutpostStereo:monitor_FR $HDMI_SINK:playback_FR
EOF
chmod +x default.sh
speaker_control_gui.py
#!/usr/bin/env python3
# speaker_control_gui.py
# Simple Tkinter GUI for selecting speaker modes and running routing scripts

import tkinter as tk
import sys
import subprocess
import os

# List of speaker modes and their associated scripts
MODES = {
    "Front Only": "front_only.sh",
    "Back Only": "back_only.sh",
    "Front & Back": "front_and_back.sh",
    "3.1": "three_point_one.sh",
    "Default": "default.sh"
}

# Currently selected mode (default on startup)
selected_mode = "Default"

# Dictionary to hold mode buttons
buttons = {}

# Callback when a mode is selected
def select_mode(mode):
    global selected_mode
    selected_mode = mode
    print(f"Selected mode: {mode}")
    sys.stdout.flush()
    update_buttons()
    run_script(MODES[mode])

# Run the corresponding shell script
def run_script(script_name):
    try:
        subprocess.run(["bash", script_name], check=True)
    except subprocess.CalledProcessError as e:
        print(f"Error running {script_name}: {e}", file=sys.stderr)
    except FileNotFoundError:
        print(f"Script {script_name} not found.", file=sys.stderr)

# Update the appearance/state of buttons based on selected_mode
def update_buttons():
    for mode, btn in buttons.items():
        if mode == selected_mode:
            btn.config(state=tk.DISABLED, relief=tk.SUNKEN)
        else:
            btn.config(state=tk.NORMAL, relief=tk.RAISED)

# Create main window
root = tk.Tk()
root.title("Speaker Control v2")
root.geometry("200x250")
root.resizable(False, False)

# Create a frame for buttons
frame = tk.Frame(root)
frame.pack(pady=20)

# Create buttons dynamically
for mode in MODES:
    btn = tk.Button(frame, text=mode, width=20,
                     command=lambda m=mode: select_mode(m))
    btn.pack(pady=5)
    buttons[mode] = btn

# Initialize button states
update_buttons()

# Run the GUI loop
root.mainloop()
These scripts are written for a specific setup (the VSX-823 sink name, and this exact channel layout), so you'll need to adjust the sink name and channel mappings to match your own hardware.
Results
The GUI works seamlessly. The receiver's MCACC tool is used to set up all the speakers, setting volume level and distance to keep them in sync and playing well together.
The GUI works as a speaker switch in software, which is useful since most receivers don't offer a way to pick between sets of speakers on their own. The software switch has several advantages over a hardware switch:
- No extra wires or connections
- Impedance matching is a non-issue
- Independent amplification and MCACC calibration of each speaker is maintained
- Wireless control (using a wireless mouse)
- Flexibility and scalability (for example, a 7.1 receiver could run a Bi-Amped “Speaker A” pair, regular “Speaker B” pair, or both at the same time)
- No electrical connections being made or unmade: no arcing, popping, physical wear, etc.
The LFE channel is only used by the Dual Front and 3.1 scripts. Setting the receiver's subwoofer output to “PLUS” (also called “Extra” on some receivers) brings the sub in as needed for the other modes.
Final Thoughts
The Linux tools give the flexibility to map, unmap, combine, or duplicate any channel. This is functionality that even the best receivers don't have.
This approach isn't limited to Linux. It also works on Windows 11, though with more friction. The core concept is identical: a virtual audio device (VB-Audio Virtual Cable, the Windows equivalent of PipeWire's null sink) accepts audio from applications, and a small C# application reads from it via WASAPI loopback, remaps channels in real time, and writes directly to the receiver.
The main difference is channel count management. On Linux, PipeWire lets you configure the output channel count freely in software. On Windows, the number of channels the audio engine exposes in shared mode is locked to whatever the device is configured to in Sound settings. Changing it programmatically is surprisingly difficult, particularly on Qualcomm Snapdragon hardware. No reliable programmatic solution was found, and setting the channel count manually was necessary.
This writeup is free to use, modify, and share.
If it saved you time, solved a problem, or helped you avoid buying a new $1200 Receiver, consider making a voluntary payment of any amount to support more work like this.
Questions, comments, complaints, and improvements are welcome.